Review station
The Review Station module within TruCap+ is designed to streamline the process of adding newly introduced source identifier values to the application's source database. This documentation offers a comprehensive overview of the Review Station module, explaining its purpose and functionality within the TruCap+ ecosystem.
The Review Station module serves as a centralized platform for users to seamlessly incorporate recently added source identifier values into the TruCap+ source database. By utilizing this module, users can efficiently manage and integrate new source identifier values during the manual handling of documents, enhancing data accuracy and organization.
Key Features and Benefits
Seamless Integration: The Review Station module offers a user-friendly interface that simplifies the process of adding new source identifier values to the application's source database.
Data Accuracy: By incorporating source identifier values directly into the source database, TruCap+ ensures that subsequent document processing is precise and aligned with the established source identifiers.
Efficient Document Handling: The module's integration with manual document handling allows users to conveniently associate new source identifier values as they review and process documents.
Accessing Review Station
To access the Review Station page, follow these steps:
-
In the main menu, under Trucap+ Studio, click Review Station. The Review Station page opens.

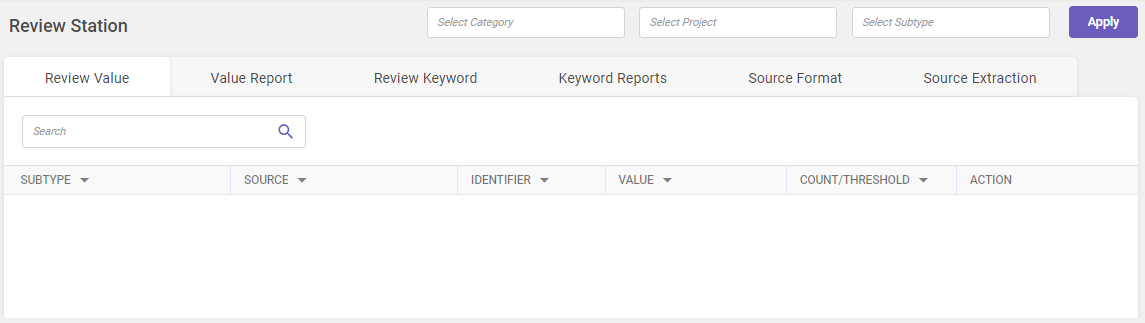
Following tabs are available on the Review Station page:
-
Review Value
-
Value Report
-
Review Keyword
-
Keyword Reports
-
Source Format
-
Source Extraction
-
Select the required category, project, and subtype from the drop-down and then click Apply. All records matching the given criteria are displayed in the grid.
Note:
It is mandatory to select Category and Project to display the records.
All records matching the given criteria are displayed in the grid. Utilize the Search field to filter and find specific records within the displayed grid (Refer searching data).
Click on the buttons inside the tabbed menu to know more.
Displays the list of source identifiers defined for specific subtypes during manual handling of the document. The user can accept or reject the source identifiers, once accepted the source identifier gets added to the database. Utilize the Search field to filter and find specific records within the displayed grid (Refer searching data).
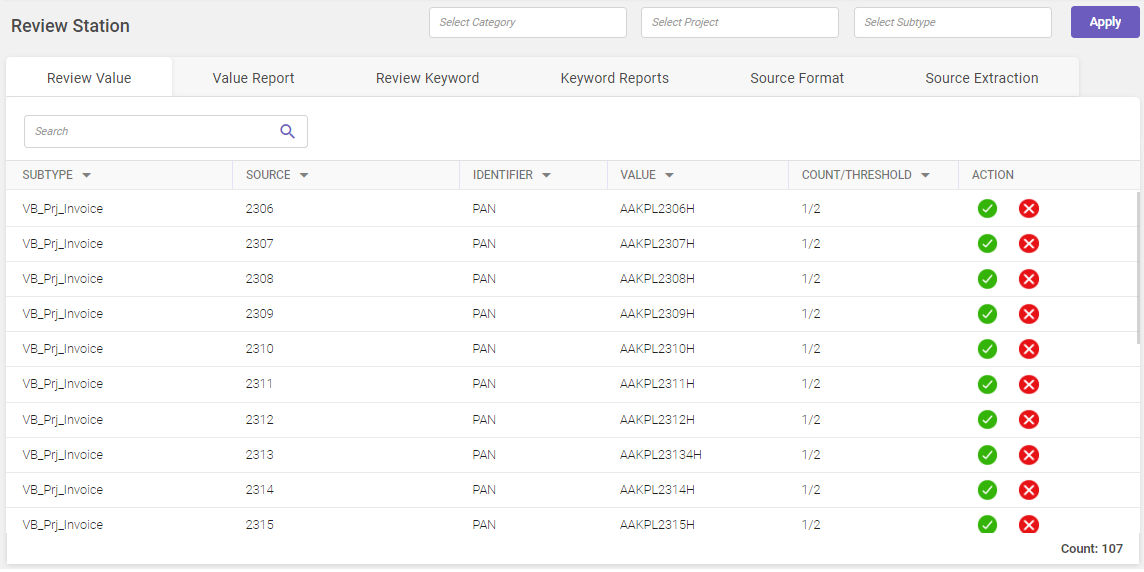
Column header descriptions
|
COLUMN NAME |
DESCRIPTION |
|---|---|
|
Subtype |
Displays the subtype name for which the source identifiers are defined. |
|
Source |
Displays the source name. |
|
Identifier |
Displays the name of the identifier defined for the required subtype. |
|
Value |
Displays the selected entry for the source identifier. |
|
Count/Threshold |
Displays the number of counts and the threshold defined for the identifier. |
|
Action |
Action to |
 Accept or
 Reject the source identifier.
Displays the list of accepted or rejected source identifiers by the user. You can generate the report for a selected duration.
You can use the  icon to specify the required duration. All records matching the given criteria are displayed in the grid. Utilize the Search field to filter and find specific records within the displayed grid (Refer searching data).
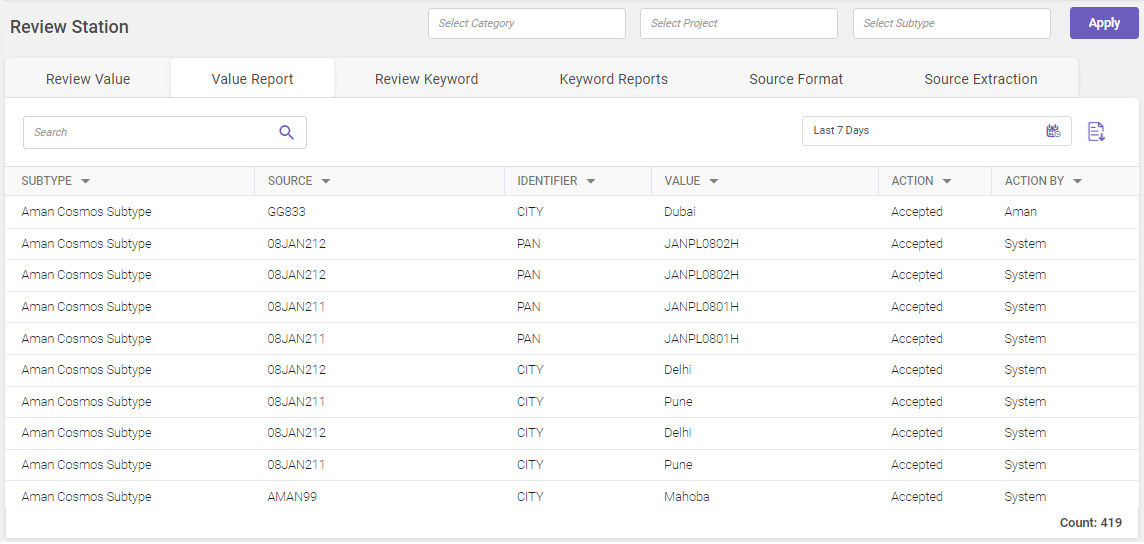
Column header descriptions
|
COLUMN NAME |
DESCRIPTION |
|---|---|
|
Subtype |
Displays the subtype name. |
|
Source |
Displays the source name. |
|
Identifier |
Displays the name of the identifier defined for the required subtype. |
|
Value |
Displays the selected entry for the source identifier. |
|
Action |
Displays the Accepted or Rejected status of the source identifier. |
|
Action By |
Displays the user name who has accepted or rejected the identifier. |
Click  to export the value report.
Displays the list of keywords captured for each source. The user can add or discard the keyword.
Note:
The Review Keyword report will only be generated if Is Captured Document Synonym setting is enabled under manual intervention application setting.
Utilize the Search field to filter and find specific records within the displayed grid (Refer searching data).
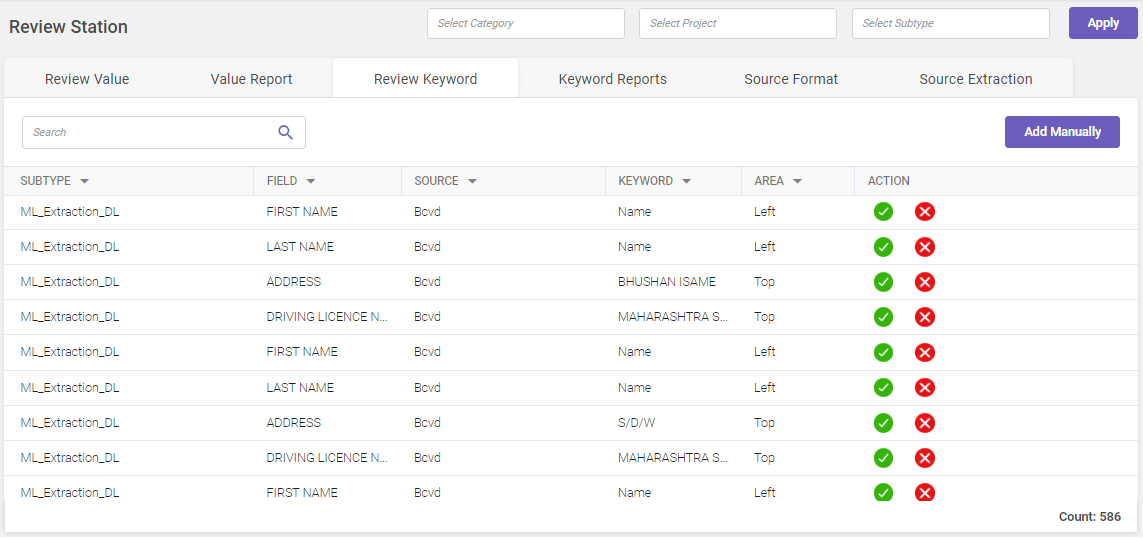
Column header descriptions
|
COLUMN NAME |
DESCRIPTION |
|---|---|
|
Subtype |
Displays the subtype name. |
|
Field |
Displays the field type name. |
|
Source |
Displays the source name. |
|
Keyword |
Displays the name of the captured keyword. |
|
Area |
The location in the document from where the keyword is identified. |
|
Action |
Action to |
To manually add keywords, perform the following steps.
-
On the top-right corner of the Review Keyword page, click Add Manually. The Add Keywords window opens.

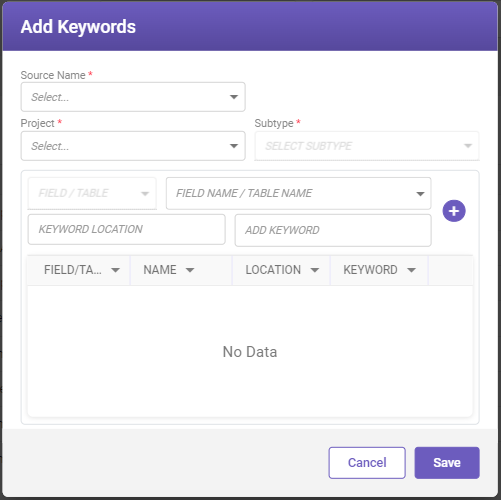
Fill-in the details based on the following field descriptions.
|
FIELD |
DESCRIPTION |
|---|---|
|
Source Name* |
Select the source name from the drop-down list. |
|
Project* |
Select the project name from the drop-down list. |
|
Subtype* |
Select the subtype name from the drop-down list. |
|
Field/Table |
Select Field or Table from the drop-down list for which you want to add the keywords. |
|
Field Name/Table Name |
Select the field name or the table name from the drop-down list for which you want to add the keywords. Depending on the selection, the available options are displayed, i.e., if Field is selected, the field names associated with the selected Source Name, Project, and Subtype. If a Table is selected, then the associated fields are displayed. |
|
Keyword Location |
Select the keyword location from the drop-down list. If Field is selected from the Field/Table field, the available options are Right, Left, Top, Bottom, Right Bottom, and Right Top. If Table is selected, then the available options are Start and Stop. Note Every keyword of a particular field will have the same direction. For Example |
|
Add keyword |
In the Add keyword field, type the keyword and then click the
Note A user can also add a keyword for a different field name for the same source. Select the required field name from the Field Name drop-down list and repeat the procedure of adding keywords. |
|
*Mandatory fields |
|

 icon, to add the keyword.
-
Click Save to save the added synonyms.
Viewing manually added synonyms
To view the manually added synonyms, perform the following steps.
-
Access the ontology page of the subtype, which contains the field name for which you have manually added the synonyms.


-
In the Keywords section, click
 icon to view the manually added synonyms as shown in below image.


Note:
To delete any manually added source synonym, access the add keywords window > search the source name and the respective field name and then click the  icon corresponding to the synonym to be deleted.
Displays the list of keywords added to the source, added to ontology, or discarded by the user.
You can use the icon to specify the required duration. All records matching the given criteria are displayed in the grid. Utilize the Search field to filter and find specific records within the displayed grid (Refer searching data).
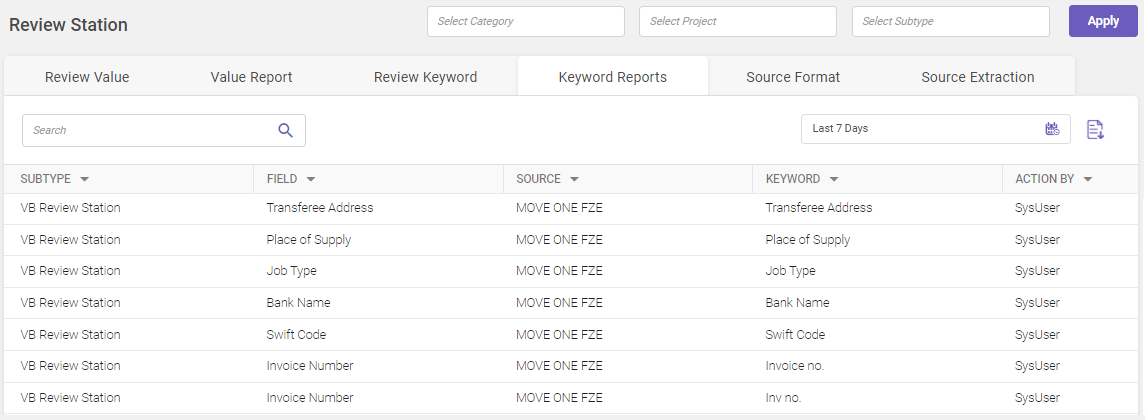
Column header descriptions
|
COLUMN NAME |
DESCRIPTION |
|---|---|
|
Subtype |
Displays the subtype name. |
|
Field |
Displays the field type name. |
|
Source |
Displays the source name. |
|
Keyword |
Displays the name of the captured keyword. |
|
Action By |
Displays the user name who has added or discarded the keyword. |
Click to export the keyword report.
The Source Format page allows a user to set a date and currency style format for a particular source. Utilize the Search field to filter and find specific records within the displayed grid (Refer searching data).
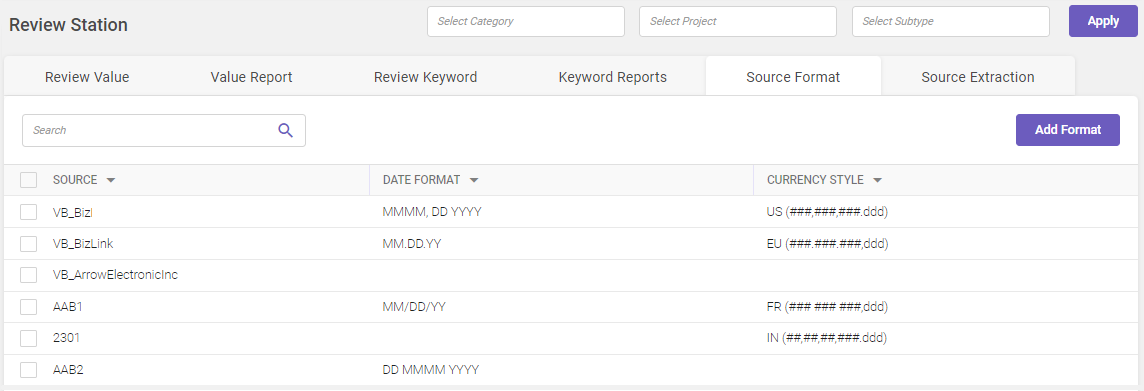
Column header descriptions
|
COLUMN NAME |
DESCRIPTION |
|---|---|
|
Source |
Displays the source name. |
|
Date Format |
Displays the date format set for the source. |
|
Currency Style |
Displays the currency style set for the source. |
To add the date and currency format for a source, perform the following steps.
-
On the top-right corner of the Source Format page, click Add Format. The Add Format Details window opens.

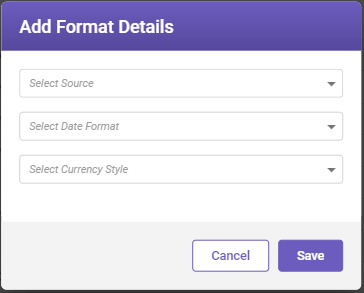
Fill-in the details based on the following field descriptions.
|
FIELD |
DESCRIPTION |
|---|---|
|
Source Name |
Select the source name from the drop-down list. |
|
Date Format |
Select the date format from the drop-down list. |
|
Currency Style |
Select the currency style from the drop-down list. |
-
Click Save to save the format.
Note:
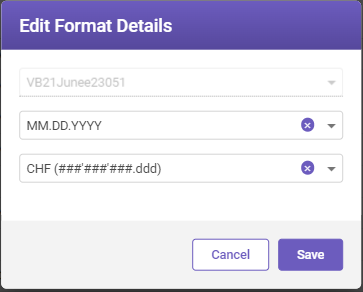
While editing the format, the Source Name field is disabled.
To edit the format, perform the following steps:
-
On the Source Format page, select the required format and then click Edit. The Edit Format Detailswindow opens.

-
Modify the required details and then click Save.
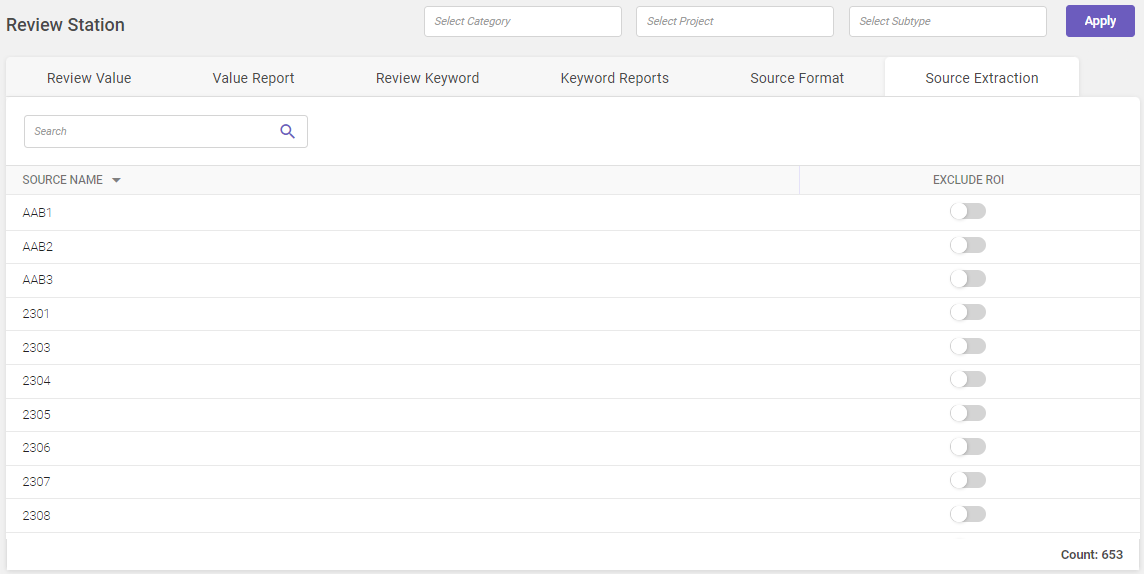
The Source Extraction page allows a user to exclude ROI-based extraction for a particular source. Utilize the Search field to filter and find specific records within the displayed grid (Refer searching data).
Column header descriptions
|
COLUMN NAME |
DESCRIPTION |
|---|---|
|
Source Name |
Displays the list of all the source name. |
|
Exclude ROI |
Displays the toggle switch to enable/disable the source name to exclude ROI based extraction. |
If the toggle under the Exclude ROI column is enabled, the data will not be extracted for the particular source using ROI-based extraction. The working of keyword-based extraction remains unchanged.